In high-performance physique engineering, achieving a tapered, high-tension midsection transcends superficial abdominal aesthetics. True core functionality requires systematic conditioning of the layered muscle walls to maximize intra-abdominal pressure, optimize kinetic force transfer, and counter structural pathologies such as lumbar hyper-lordosis and visceral distension. Relying on high-volume, low-threshold floor exercises often causes secondary muscle compensation, forcing the hip flexors and upper trapezius to override the deep abdominals.
This master-level routine targets the full length of the Rectus Abdominis, the internal and external Obliques, and the deep Transverse Abdominis (TVA)—the body’s natural anatomical corset. Requiring no external machinery, this system utilizes specific leverages, controlled breathing, and isometric holds to retrain core firing patterns, relieve lower back strain, and generate a flatter, more contoured midsection profile.
Anatomical Matrix of Midsection Re-Composition
| Target Muscle Layer | Primary Biomechanical Motion | Physique Aesthetic Outcome |
|---|---|---|
| Upper Rectus Abdominis | Thoracic-on-Pelvic Flexion | Defines upper abdominal intersections and wall density. |
| Lower Rectus Abdominis | Pelvic-on-Thoracic Flexion (Posterior Tilt) | Flattens the sub-umbilical region and reduces lower belly pooch. |
| Internal & External Obliques | Torso Rotation & Lateral Stabilization | Cinches the lateral abdominal walls for a tapered waist profile. |
| Transverse Abdominis (TVA) | Visceral Compression & Intra-Abdominal Pressure | Sucks in the abdominal wall, directly reducing resting waist diameter. |
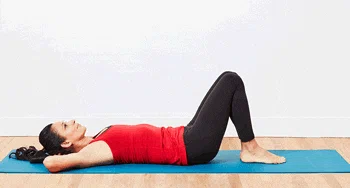
1. The Kinetic Abdominal Crunch (Thoracic Flexion)
This entry-level movement isolates the upper fibers of the rectus abdominis. By limiting hip movement, it ensures the upper abdominal wall bears the full mechanical load during spinal flexion.
Step-by-Step Execution:
- Step 1: Setup Position: Lie supine on a supportive mat. Flex your knees to 90 degrees and place your feet flat on the floor, separated hip-width apart (approximately 12–18 inches from your glutes).
- Step 2: Tactile Placement: Place your fingertips lightly behind your ears with your elbows flared wide, or cross your arms over your chest. Do not clasp your hands behind your head to avoid neck strain.
- Step 3: Pre-Activation: Engage your core by drawing your navel down toward your spine, pressing your lumbar region flat against the mat to remove any space under your lower back.
- Step 4: Concentric Phase: Exhale completely as you curl your head, neck, and shoulders upward. Focus on shortening the distance between your sternum and your pubic bone.
- Step 5: Peak Flexion: Lift only until the inferior angles of your shoulder blades clear the floor. Keep your lower back flat against the mat; do not sit all the way up. Squeeze hard at the apex for 1 full second.
- Step 6: Eccentric Phase: Inhale and slowly lower your spine one vertebra at a time back to the floor over a controlled 3-second count, keeping constant tension on the muscles.
Prescription: 3–4 sets of 12–20 controlled repetitions.
* Advanced Option: Perform a 4-second eccentric descent, pausing for 3 seconds at the peak of contraction to increase time under tension.
* Form Tip: Keep your chin slightly tucked as if holding a tennis ball beneath your jaw. Lead the movement with your chest to keep your neck relaxed.
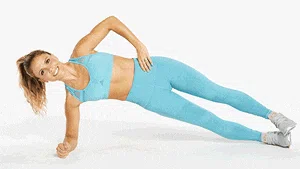
2. Frontal-Plane Isometric Side Plank
An excellent lateral stabilization exercise. The side plank targets the obliques and deep spinal stabilizers, using isometric holds to narrow the lateral walls of the waist.
Step-by-Step Execution:
- Step 1: Setup Position: Lie laterally on your right side, propping your upper body up on your right forearm. Align your elbow directly beneath your shoulder joint to ensure proper weight distribution.
- Step 2: Stacking Options: Stack your left foot directly on top of your right foot. For additional balance, stagger your feet by placing your left foot flat on the floor in front of your right.
- Step 3: The Isometric Lift: Flex your obliques and glutes, driving your hips vertically up until your body forms a straight line from your head to your heels.
- Step 4: Extremity Placement: Rest your top hand on your hip, extend it straight toward the ceiling, or place your fingertips lightly behind your head.
- Step 5: Structural Hold: Maintain this elevated position. Ensure your hips do not sag toward the floor or rotate forward. Breathe deeply and evenly through your nose.
- Step 6: Transition: Lower your hips with control, switch your orientation, and repeat the sequence on your left side.
Prescription: 3 sets of 20–60 second holds per side, increasing duration weekly.
* Advanced Option: Add dynamic hip dips, slowly lowering your pelvis 3 inches and driving it back up, or raise your top leg into full abduction.
* Form Tip: Push your forearm into the floor to keep your shoulder stable and prevent your neck from collapsing toward your chest.
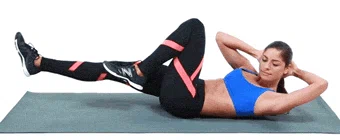
3. The Reciprocal Bicycle Crunch (Transverse Plane Torque)
This exercise combines spinal flexion with rotational torque, forcing the upper and lower abs to contract simultaneously while targeting the obliques.
Step-by-Step Execution:
- Step 1: Setup Position: Lie flat on your back, placing your fingertips lightly behind your head with your elbows wide. Lift your shoulders into a slight curl and raise your legs into a 90-degree tabletop position.
- Step 2: The Cross-Drive: Exhale deeply as you rotate your ribcage to the left, driving your right armpit toward your left knee. At the same time, extend your right leg straight forward at a 45-degree angle.
- Step 3: Peak Squeeze: Hold this twist for a split second, contracting your side obliques while keeping your lower back flat against the floor.
- Step 4: Reciprocal Transition: Inhale as you return toward the center, then immediately switch sides. Bring your left armpit toward your right knee while extending your left leg long.
- Step 5: Pace Protocol: Move in a slow, pedaling rhythm. Do not rush or pull your elbows forward; ensure the rotation comes from your torso.
Prescription: 3–4 sets of 12–20 repetitions per side (24–40 total reps per set).
* Advanced Option: Pause for 2 seconds at the peak of each twist, extending your straight leg just 2 inches above the mat to maximize the work on your lower abs.
* Form Tip: Focus on moving your shoulder toward your knee rather than just your elbow. This ensures true trunk rotation.
4. Forearm Plank with Extension Leg Raises
This variation introduces movement to a static hold, challenging core stability while targeting the lower abs and glutes.
Step-by-Step Execution:
- Step 1: Setup Position: Assume a strict forearm plank position. Place your elbows directly under your shoulders, forearms parallel, with your body forming a straight line from head to heels.
- Step 2: Stabilize the Pelvis: Squeeze your glutes and pull your abs in to lock your pelvis into a neutral position. Keep your hips square to the floor.
- Step 3: Concentric Extension: Keeping your right leg straight, contract your glute and lower abs to lift your foot 6–12 inches off the floor.
- Step 4: Isometric Hold: Pause for 1–2 seconds at the top of the lift. Ensure your hips do not tilt or rotate to the side.
- Step 5: Eccentric Return: Lower your foot back to the mat with control, keeping your core tight.
- Step 6: Alternating Pattern: Repeat the movement with your left leg, maintaining a steady, rhythmic cadence.
Prescription: 3–4 sets of 10–15 extensions per leg.
* Advanced Option: Add 3 micro-pulses at the peak of each lift, or increase the hold time to 5 seconds per rep.
* Form Tip: Press your forearms into the floor to keep your upper back stable and prevent your shoulder blades from collapsing inward.
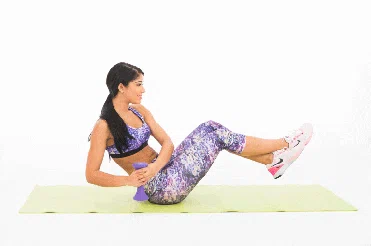
5. The Seated Complex Russian Twist
A classic rotational movement that trains the obliques through their natural function, helping cinch the waistline and improve rotational strength.
Step-by-Step Execution:
- Step 1: Setup Position: Sit on your mat with your knees bent and feet flat on the floor. Lean your torso back to a 45-degree angle, keeping your chest open and your spine long and straight.
- Step 2: Limb Elevation (Optional): For advanced core recruitment, lift your feet 6 inches off the mat, balancing on your sit bones. Clasp your hands at your chest.
- Step 3: Rotational Execution: Exhale and rotate your entire ribcage to the right, tapping your hands on the floor just outside your right hip.
- Step 4: Torque Squeeze: Contract your left obliques at the edge of the twist, keeping your knees pointing straight forward.
- Step 5: Controlled Return: Inhale as you return to the center, then exhale and repeat the twist to your left side.
Prescription: 3–4 sets of 12–20 repetitions per side.
* Advanced Option: Hold a 10 lb dumbbell or medicine ball, and straighten your legs to increase the work on your lower abs.
* Form Tip: Focus on turning your shoulders from side to side rather than just moving your arms across your body.
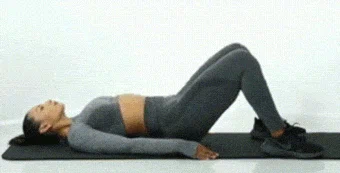
6. The Supine Pelvic Bridge (Posterior Chain Anchor)
Strengthening the posterior chain is essential for core balance. The glute bridge corrects an anterior pelvic tilt, which can cause the lower stomach to protrude forward.
Step-by-Step Execution:
- Step 1: Setup Position: Lie on your back with your knees bent and feet flat on the floor, separated hip-width apart. Position your heels 12–18 inches from your glutes.
- Step 2: Pelvic Pre-Set: Tighten your abs and press your lower back into the mat to remove any arching in your spine.
- Step 3: Concentric Drive: Drive through your heels and squeeze your glutes to lift your hips toward the ceiling.
- Step 4: Linear Alignment: Lift until your body forms a straight line from your knees to your shoulders. Do not over-arch your lower back at the top.
- Step 5: Peak Squeeze: Hold this bridge for 2–3 seconds, squeezing your glutes and lower abs as tight as possible.
- Step 6: Eccentric Descent: Lower your hips slowly, stopping just before they touch the floor to keep the muscles under constant tension.
Prescription: 3–4 sets of 15–25 repetitions.
* Advanced Option: Perform the movement on a single leg, extending the opposite leg straight out at a 45-degree angle.
* Form Tip: Drive exclusively through your heels rather than your toes to maximize glute recruitment and protect your knees.
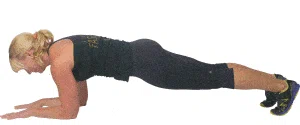
7. The Structural Forearm Plank (Total Stability)
The standard benchmark for deep core endurance. The forearm plank trains the transverse abdominis to act as a tight brace, flattening the stomach and supporting the spine.

Step-by-Step Execution:
- Step 1: Setup Position: Lie face down, then place your forearms flat on the floor with your elbows positioned directly beneath your shoulders.
- Step 2: Elevation: Lift your torso and thighs onto the balls of your feet, bringing your body into a straight line from head to heels.
- Step 3: Core Compression: Pull your navel in toward your spine, squeeze your glutes, and tighten your quads to lock your pelvis in place.
- Step 4: Maintain Alignment: Keep your hips level with your shoulders. Do not let your lower back sag or your hips pike upward.
- Step 5: Cervical Line: Keep your gaze directed slightly forward at the floor to maintain a neutral neck, breathing steadily through your nose.
Prescription: 3–4 sets of 20–90 second holds, focusing on perfect form over duration.
* Advanced Option: Incorporate body saws, slowly rocking your weight forward and back on your toes to change the leverage on your core.
* Form Tip: Imagine pulling your elbows toward your toes to maximize tension along the anterior trunk wall.
The 15-Minute Structural Core Programming
To maximize muscle density and trim the waistline, perform these 7 exercises as a continuous metabolic circuit 4–6 days per week:
- Run each exercise back-to-back, matching the prescribed reps or hold times.
- Limit rest intervals between exercises to 30–60 seconds to keep the heart rate elevated.
- Rest for 1–2 minutes after completing a full round, then repeat the circuit 3–4 times.
- Pair this routine with a protein-dense, calorie-controlled diet to reduce body fat and reveal a leaner midsection.
Train with precision. Control your movement. Rebuild your core definition.